Punto GT 'Competizione'

Picked up this last night as I need another steed whilst I wait for the insurance company to stop faffing around and make me an offer :blink:

DSC_0168.jpg


DSC_0167.jpg


DSC_0170.jpg


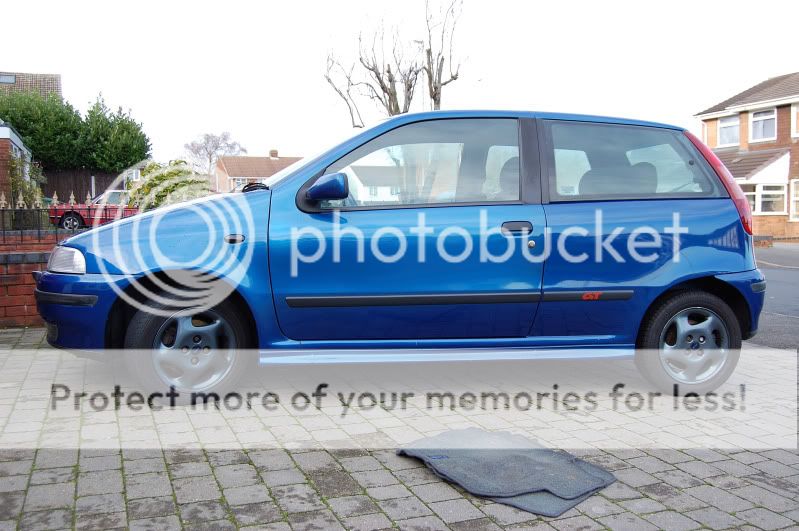
2 previous owner's, 98k on the clock but standard (for the moment) except a DV, filter and smoked side repeaters. In really good nick for the age apart from rust on the drivers front wing:

DSC_0169.jpg


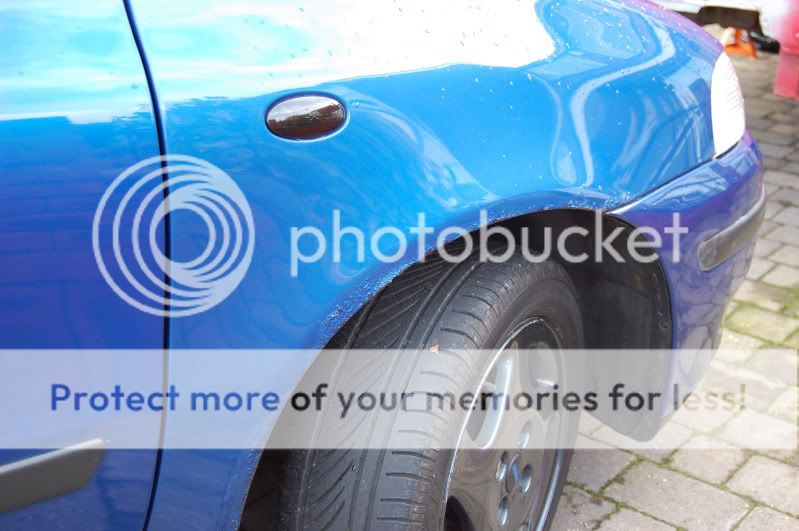
However, I'm picking up another wing from Sheffield next week.
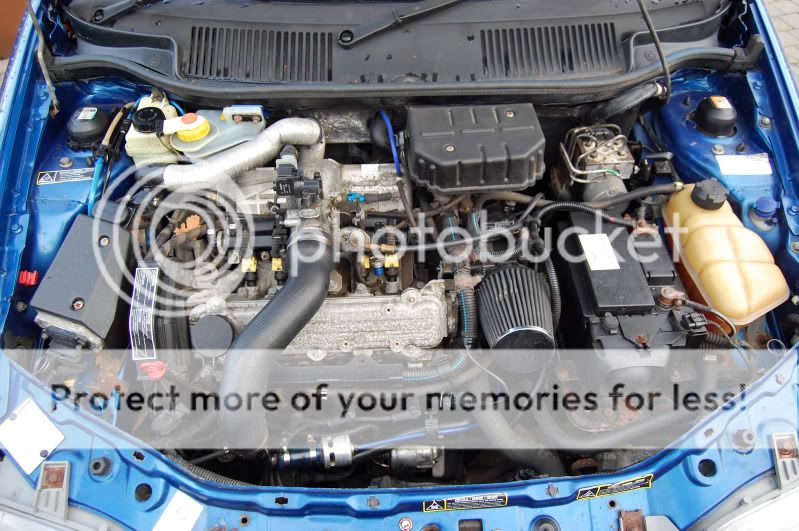
 
Battery cut-off switch to stop any parasitic load on the racing battery without having to disconnect it every time I leave the car.

DSC_0016-2.jpg
 
MS2 arrived yesterday!!! Ordered with black case, uprated 4 bar map sensor (standard MS one is 2bar, which is poo because the first bar is atmospheric, no good for loadsa boost!!!), boost control solenoid and mod kit, plus mod kits to run the GT coil pack and ICV. Cable for laptop and USB to serial adaptor.

Megamanual: http://www.megamanual.com/mtabcon.htm

DSC_0002-4.jpg


Set up a nice little workspace in an unused bereau.

DSC_0006-2.jpg


MS V3 main board itself:

DSC_0003-4.jpg


First you need to get your bad self some soldering skills. Bascially you need a hot clean tip, basic tutorials avaliable everywhere.
 
Last edited:
First step is to print off the PCB diagram:

DSC_0015-4.jpg


Then see if the PCB fits the case. They often don't because of slight manufacturers tolerences. Mine didn't but this is easily rectified by filing down the side of the board. Perfecto:

DSC_0013-4.jpg


Then I installed the connectors. Clip into place on one side of the board...

DSC_0019-1.jpg


....then turn over and solder:

DSC_0017-2.jpg


As for the capaciters, resistors etc you need to insert the legs then bend outwards to keep them in place. Solder these then cut off the legs:

DSC_0020.jpg


DSC_0021.jpg


This is as far as I got today. Including plenty of solder practicing beforehand, stopping for the postman and cottage pie it's taken about two hours lol.

DSC_0022-2.jpg
 
Last edited:
They do come pre-made but I fancy a challenge and it's a fair bit cheaper. This is a project on more of a budget than the last one. No unecessary luxuries (IE £900 Arrow rods when standard £60 UnoT ones are good for 300bhp and 40grams lighter per rod than GT ones).

It's about time I learnt about electric gubbins in fairness.
 
fair play mate i absolutely hate anything electronic wise now!!!!!!
suppose nearly 2 and a bit years of being a tv and video engineer apprentice took its toll:sad2:
 
fair play mate i absolutely hate anything electronic wise now!!!!!!
suppose nearly 2 and a bit years of being a tv and video engineer apprentice took its toll:sad2:

Ah you should be able to whack a kit together in a matter of seconds then :bigsmile: Too tired to work on it tonight after work, early finish tomorrow I think so I'll get stuck in then. Fancy going to play some 360 :amuse:
 
lol, looks good, can't wait to see the results

Cheers, its a fairly big learning curve but luckily MS is designed to be as user-friendly as possible. Done some work on the PCB, update to come soon.

Passenger side driveshaft with knackered boot:

19072010603.jpg


Knocked the end cap off, then removed the circlip and took the inner CV joint and outer boot off:

19072010604.jpg


23072010608.jpg


Cleaned the shaft and joints completely with kerosene. Packed the outer joint with grease and then slipped on a fresh outer boot:

23072010610.jpg


23072010611.jpg


New inner CV joint, boot and circlip then added and end cap but back on to complete the shaft:

23072010609.jpg


Lick of paint to match the coilovers:

31072010615.jpg
 
Last edited:
Wilwood bells rubbed down and painted matt black. Surface rust rubbed off the rotors. Then bolted them together with high tensile bolts and lock nuts. Thanks to the misses for the help this afternoon :amuse:

01082010616.jpg


Cleaned up the calipers and brackets too. Ready to put back together the drivers side, getting a new bearing pressed into the passenger side hub carrier. HEL brake lines for the front are on the way!
 
New front wishbones given an extra few coats of Matt black and fitted with the only poly bush Powerflex make for the Mk1 Punto:

02082010622.jpg


The other one is still drying.
 
Casualty of the day due to a rusted solid brake line union one of which then decided to round off, spin and snap the solid brake pipe clean off. F*cking cheers :x

02082010624.jpg


02082010623.jpg


That's annoyed me no end and I've sacked the car off for today. Traced the line back to the ABS so I know where it goes, have to ring Fiat and order a new one in the week. Only a tenner.
 
On a lighter note I thought I'd better approach the electronics workbench again :lol:

02082010625.jpg


Added the heatsink bar and a voltage regulator, not forgetting heatsink compound underneath:

02082010627.jpg


Completed the rest of the power circuit so the PCB now looks like this:

02082010626.jpg


That took about another half an hour to what I had already done.

Now I'm just waiting on the stimulator from my mate. A stimulator is used to test the ECU at various stages before hooking it up to the car. This can be bought in kit form for an additional $85 but isn't needed after testing plus I knew I could borrow my mates so spared myself the $85. When it comes I can test the power circuit, check voltages and then continue on if all is okay!
 
You're starting to make some real progress here now. Will you finish your project before Old Git does his?
 
Looks all good make, powerflex only do the front ploy bush for the 306 as well (the front bush on the front wishbone), I've no idea why because they do both for the 205 and 309. I would have thought that changing the front and rear bush on the front wish bone would be best, I've been looking for some alternatives for ages to no avail as mine could do with replacing there not bad but the standard bushes have been in the car for over 12 years now so I think it's time for a change, i've also found a company that do roller bearing front bushes (front and rear on the front wishbone) but I reckon this would ruin the ride too much same as fitting solid rear beam mounts, thoughts? (sorry for thread jacking MA)
 
I know very little about roller bearing bushes tbh, probably best to start a seperate thread. You're not hijacking, this thread is here to raise questions such as that.
 
ogs car will smash mine into tiny rusty pieces lol. Fancy my chances against anything else on the forum though :) i think i am swaying towards black too.
 
Solid mounts, that way it won't be comfortable to drive for anyone that isn't my height or even proportions :lol:

ill be ok for a test drive then i only have a 28" waist and 5'9" i think:bigsmile:

are you doing you engine swap yourself?? if so how are you going to get on with needing an engineering report to change you logbook???
 
Well I'm a 32" waist as well and ive sat in those before and they are rather snug i have to say...
 
Last edited by a moderator:
wow i wish i could afford to do all that, i only ust have enough to get the head gasket sorted out
 
Similar threads
Thread starter Title Forum Replies Date
MasterAuron Punto GT 'Competizione' Part 2 (16VT Conversion) Projects & WIPs 77
Puntopimp The Fiat Punto Project Projects & WIPs 40

Similar threads


Please watch this on my YouTube channel & Subscribe.


Back
Top