
just curious here. but when you have a rebuilt engine like yours does it have oil in the sump or are all the components just covered in oil??
You are using an out of date browser. It may not display this or other websites correctly.
You should upgrade or use an alternative browser.
You should upgrade or use an alternative browser.
At Last!. I have started on my car ;-) PART 2
- Thread starter pgarner
- Start date
just curious here. but when you have a rebuilt engine like yours does it have oil in the sump or are all the components just covered in oil??
Specialist engine building lubricants are used during the build, but there is no oil in the sump. This will be added prior to first start-up.
MasterAuron
Very Senior Member
Engine doesn't look like it took much fitting lol. Getting there, getting there!
Just had to shorten the bellhousing and gearbox input shaft, cut a section out of the crossmember, reduce the sump depth by 40mm and reposition the crank sensor.
Oh, and reshape the bonnet due to the height of the turbo and cam pulleys.
Oh, and move bulkhead back 200mm so that the exhaust can run behind the engine and out the passenger side.
Oh, and modify chassis to accommodate starter motor.
Oh, and make new gearbox mount.
As you say, didn't take much")
Oh, and reshape the bonnet due to the height of the turbo and cam pulleys.
Oh, and move bulkhead back 200mm so that the exhaust can run behind the engine and out the passenger side.
Oh, and modify chassis to accommodate starter motor.
Oh, and make new gearbox mount.
As you say, didn't take much
T9 man
TC ModFather
Blimey, so what did you do after breakfast then OG :blink:

pgarner
TC ModFather
played some chess
Blimey, so what did you do after breakfast then OG :blink:
Fortunately, I had done all of that stuff earlier, so I was able to repaint the house as well as play chess with Bobby Fisher.
MasterAuron
Very Senior Member
You know what I meant. If you don't, I meant just in terms of bolting in and out now all the modifications are done :amuse:
Yes, I knew what you meant
MasterAuron
Very Senior Member
Just checking, things often don't come accross how you mean them in text form!
pgarner
TC ModFather
Fortunately, I had done all of that stuff earlier, so I was able to repaint the house as well as play chess with Bobby Fisher.
Christ me and T9 are only coming for a quick look no need to repaint the whole house for us
T9 man
TC ModFather
^^ +1
I will be just as happy with a decent coffee and a chocolate digestive
I will be just as happy with a decent coffee and a chocolate digestive
^^ +1
I will be just as happy with a decent coffee and a chocolate digestive
Instant or ground, we can do both. However, you will have to bring your own biscuits
T9 man
TC ModFather
Christ me and T9 are only coming for a quick look no need to repaint the whole house for us
That's just OG all over! Extreme detailing on the car build and extreme detailing on the hospitality!
That's just OG all over! Extreme detailing on the car build and extreme detailing on the hospitality!
I have Jaffa Cakes
MasterAuron
Very Senior Member
One of those one step forward, two steps back days.
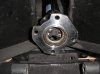
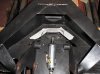
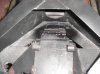
Fitted diff this evening. This went fine until it came to bolting on the prop. This proved to be impossible due to it fouling strenghening webbing added to stiffen up the area (can just be seen in the photo of prop). Only need to remove around 10mm and this won't cause problems as we went over the top in this area. I will attack this task tomorrow.
You will notice that the prop flange isn't round. This is due to my obsession with weight - Prop manufacturer took off excess metal where possible.
http://www.torquecars.com/forums/attachment.php?attachmentid=1436&stc=1&d=1328573911
http://www.torquecars.com/forums/attachment.php?attachmentid=1437&stc=1&d=1328574316
Attachments
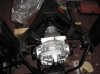
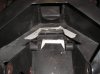
Diff back in after 10 minutes with the grinder. Not a brilliant job (should have curved the corners), but awkward to get to and it can't be seen
http://www.torquecars.com/forums/attachment.php?attachmentid=1458&stc=1&d=1328743826
http://www.torquecars.com/forums/attachment.php?attachmentid=1459&stc=1&d=1328743826
http://www.torquecars.com/forums/attachment.php?attachmentid=1460&stc=1&d=1328743826
http://www.torquecars.com/forums/attachment.php?attachmentid=1458&stc=1&d=1328743826
http://www.torquecars.com/forums/attachment.php?attachmentid=1459&stc=1&d=1328743826
http://www.torquecars.com/forums/attachment.php?attachmentid=1460&stc=1&d=1328743826
Attachments
Last edited:
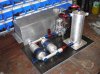
Fuel system mocked up on CF composit board:
http://www.torquecars.com/forums/attachment.php?attachmentid=1464&stc=1&d=1328903267
http://www.torquecars.com/forums/attachment.php?attachmentid=1465&stc=1&d=1328903267
http://www.torquecars.com/forums/attachment.php?attachmentid=1464&stc=1&d=1328903267
http://www.torquecars.com/forums/attachment.php?attachmentid=1465&stc=1&d=1328903267
Attachments

MasterAuron
Very Senior Member
Nice :amazed: What pumps are you using?
pgarner
TC ModFather
still cant believe how light and rigid that board
Nice :amazed: What pumps are you using?
Thanks. Holley Blue label as the lifter and Bosch 044s for the serious stuff.
still cant believe how light and rigid that board
I was impressed as well, but it should be light and rigid for £80!
Might drill a few holes in it to reduce the weight further, or maybe not
T9 man
TC ModFather
Thanks. Holley Blue label as the lifter and Bosch 044s for the serious stuff.
The 044's must be for the afterburner OG
T9 man
TC ModFather
I was impressed as well, but it should be light and rigid for £80!
Might drill a few holes in it to reduce the weight further, or maybe not
If you drill any holes into that board to make it any lighter OG, then you had better bolt it down otherwise it will be airborne in the first gentle breeze in your garage
If you drill any holes into that board to make it any lighter OG, then you had better bolt it down otherwise it will be airborne in the first gentle breeze in your garage
Ah, yes, I was going to ask if you put the paper weight back on it when you put it down?
T9 man
TC ModFather
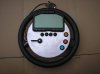
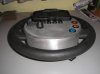
Progress on steering wheel. Decided not to cram everything onto the wheel. It is getting crowded under the plate and I think I only need to fit what needs to be at hand on a regular basis. May not even fit horn to it (yet to be decided). So far, four butons to control screen, line lock, launch control, traction control and indicators. Still room for nitrous button
I will put rest either on dash (including boost gauge) or tunnel.
reduced diameter of plate by approx 10mm, giving more room for fingers.
Playing with flappy paddles. Think I have it sussed but not going to pursue it for now.
http://www.torquecars.com/forums/attachment.php?attachmentid=1470&stc=1&d=1329050990
http://www.torquecars.com/forums/attachment.php?attachmentid=1471&stc=1&d=1329050990
Attachments
Last edited:
T9 man
TC ModFather
Looking good OG, like the idea of the plate diameter reduction, I would never have been able to get my beefy fingers in the space available - actually not sure if I still could now :embarrest:
Good call about the horn button though! Just a minute :blink: have I missed something here? Do you intending on driving the car to the track day or is it to be trailered?
Good call about the horn button though! Just a minute :blink: have I missed something here? Do you intending on driving the car to the track day or is it to be trailered?
Looking good OG, like the idea of the plate diameter reduction, I would never have been able to get my beefy fingers in the space available - actually not sure if I still could now :embarrest:
Good call about the horn button though! Just a minute :blink: have I missed something here? Do you intending on driving the car to the track day or is it to be trailered?
Unlikely to be doing track days. Drag strip, sprints and hillclimbs are my bags. Car will be road legal but I will trailer to meets.
Loz
Torque King
I don't know much about fuel systems :embarrest:, aside from the obvious bits like the fuel tank & the two pumps what are the other two devices? Is the cylinder a swirl pot?
Unlikely to be doing track days. Drag strip, sprints and hillclimbs are my bags. Car will be road legal but I will trailer to meets.
Where do you plan to hill climb Og?
The smaller of the two vertical units is a Holley fuel pump, Loz. It supplies fuel to the swirl pot/header tank which ensures that the two Bosch pumps have a consistant and continous supply of fuel. The unused fuel is also returned to this tank and any excess passed back to the main tank.
Haven't looked into hill climb venues yet, but a friend races at Gurston Downs so I will probably start there.
Haven't looked into hill climb venues yet, but a friend races at Gurston Downs so I will probably start there.
Loz
Torque King
I see, cheers Og .
.
Last edited:
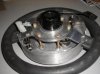
Still playing with the steering wheel. The two plugs on the back of the screen were causing problems (see earlier photos) so I have removed the 90 degree elbows from the plugs allowing for a much neater installation.
Ditched the paddles for now. KISS prevailed. There is room for gear change buttons at a later date.
A cover plate is to be made for the back which will be screwed on. When I am happy with it I will powder coat it. I have had a powder coating kit for a couple of years but had nothing to try it on It will be black, of course.
http://www.torquecars.com/forums/attachment.php?attachmentid=1489&stc=1&d=1329437241
http://www.torquecars.com/forums/attachment.php?attachmentid=1490&stc=1&d=1329437241
Ditched the paddles for now. KISS prevailed. There is room for gear change buttons at a later date.
A cover plate is to be made for the back which will be screwed on. When I am happy with it I will powder coat it. I have had a powder coating kit for a couple of years but had nothing to try it on
It will be black, of course.http://www.torquecars.com/forums/attachment.php?attachmentid=1489&stc=1&d=1329437241
http://www.torquecars.com/forums/attachment.php?attachmentid=1490&stc=1&d=1329437241
Attachments
Last edited:
Depends on what you mean by versions.
A lot of time has been spent just sitting with it (the wheel) in my hands and thinking about it (the wheel).
I started off with a flat plate, as can be seen in previous photos. Reduced its diameter a couple of times to allow more finger room.
Planned to have all car controls on it originally, but that was unrealistic - far too many cables woyuld be hanging out the back and it would have looked a mess. However, the current setup allows for additional switches to be fitted if found necessary (eg nitrous) without making it, IMO, too fussy.
The surround has worked out well, although I have had to modify the Dash2 cable plugs (removed cases) so that they didn't stick out of the side of the surround. It wasn't planned, but the depth of the surround allows me to fit a backing plate that will bolt between the steering wheel and boss. Off to my welder to get some tabs fitted to the surround today.
When powdercoated, it should look OK. It may be a bit flash for some (including me) but it will be the focus point of the interior and it has been fun doing it, if time consuming.
Last edited:
Looks good OG. Can't wait to see it finished.
T9 man
TC ModFather
I know this is going to be predominately a drag car, as going in straight lines mostly etc but if doing hillclimbs (hairpin bends) will you be looking to use coiled cables to give controlled slack? I was thinking of those used on touring and rally cars where they have steering wheel based controls.
Similar threads
Similar threads

