Changing brake pads and discs
"Taking a brake from it all"
This is an article is primarily based on a 2002 VW Bora, but I've changed discs and pads on many a car down the years and the basics are pretty much the same for standard systems. Because car makes and models do vary we suggest you consult with a good workshop manual to get an overview of the specifics for your car. As always if you are not reasonably competent at car mechanics please leave work to a professional.
If you've got a big brake four caliper system, or some high spec carbon ceramic solution, or a solution where the rotor (friction plate portion) and hub of the brake disc are separate components then you may need to get more information.
It covers the front discs and pads specifically but the same principles can be applied to the rear of the car, with the only provision being that the rear will have some form of handbrake system – this will usually be a cable and lever assembly that presses the pads onto the discs or in some cases a small, separate drum or disc system. In this case grab yourself a Haynes manual and look up what to do. In the case of a cable it will simply need disconnecting.
Changing brake pads and discs.
The tools you are likely to need will be a wheel wrench, a socket set, the specific removal socket for the caliper floating pins (explained below), a pair of pliers, a piston windback tool, some copper grease and lots of rags. A torque wrench is useful but not absolutely necessary. The windback tool shouldn’t cost you more than around £20. In the past I have used a big long lever to push the piston back and an adjustable spanner and a flat-bladed chisel to turn a piston back and believe me, a windback tool can do both these jobs and make them much, much easier.
Changing pads and discs is really one of the easiest jobs you can do technically and given the price you can get new parts from over the Internet these days, can save you a good amount of money.
If it’s your first time allow yourself at least an hour and half to two hours.
What is a brake system anyway?
This is a fair question and it helps to understand the principles involved. When you put your foot on the brake pedal the braking system magnifies that force and uses it to make a piston push brake pads against a disc. The friction of this slows you down. The basic idea is a simple as that.
The piston is held inside a housing which is mounted on metal pins that connect it to the “caliper carrier”. The word “caliper” is used to describe the whole piston housing, and so in this article I use “piston” for just the piston and “caliper” for the whole piston housing.
The metal pins allow the caliper to float back and forth, which ensures that as the discs and pads wear down the piston follows them, so the whole system is self-adjusting. The caliper carrier is itself bolted to the bottom of the suspension strut next to the hub to which the brake disc and then the wheel are bolted.
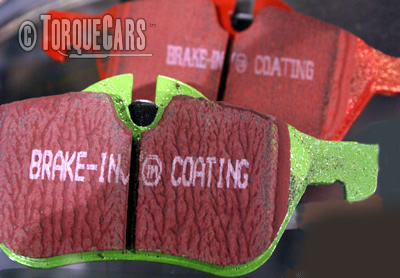
Usually you can replace brake pads 2 or 3 times before you need to do the discs also. However the discs do have a minimum thickness which is tested in your MOT and as standard discs are very cheap to buy it’s often worth replacing them before you approach that minimum. Some cars also have disc pad wear sensors. This will be an electrical cable connected to the inner pad on one side of the car. You’ll need to disconnect this.
If your new pads don’t come with them it is not going to affect your braking, but you will get a light on your dashboard that you’ll need to either ignore, or get the warning removed electronically. For instance, on VAG group cars this can be removed using the vagcom utility, and other cars have similar systems. Ask in our forum for more information.
General tips before you start.
It’s been said many times but it’s worth saying again; never, ever work under the car with just a jack. Saving yourself £10 or £20 for a pair of axle stands is not worth giving yourself an accidental leg amputation.
Secondly, when you’re taking the wheel off, loosen the wheel nuts before you jack it up. This way you won’t rock the car off the jack or stand while you try to remove a nut that’s been put on with an air gun. In the same way, when putting the wheel back on, tighten the nuts hand tight and then a small turn with the wheel wrench, then lower the wheel to the floor before fully tightening. If you have a torque wrench then use it, otherwise tighten about half a turn again once the wheel is down.
Lastly, if you’ve not done this before, take some photos as you go, so you can look back on them if you’re not sure what went where.
Ok, let’s get cracking.
Ok, so let’s get on with it. First thing is to locate your brake fluid reservoir. This usually has a bright cap, yellow, green or red, and the cap will have sensor wires coming out of it. If you’re not sure your handbook should be able to tell you where it is. Remove the cap and have a look at the level. You will need to keep an eye on this as you work. Right now as your discs and pads are worn the piston will be fully out, and winding it back in will raise the level. It can be lowered by using a siphon or syringe, to dip into the fluid and draw some up. Whichever way you do it be careful not to get brake fluid on you or the rest of the engine bay. Brake fluid is not good stuff. The cloth must be clean to avoid getting dirt into your brake fluid.
So, take the cap off, and wrap some cloths around the reservoir, to help stop any accidental drippages.
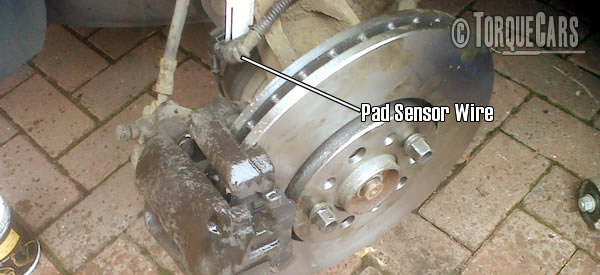
Jack the car up and then secure it on an axle stand. Remove the wheel and you should see something similar to the following:
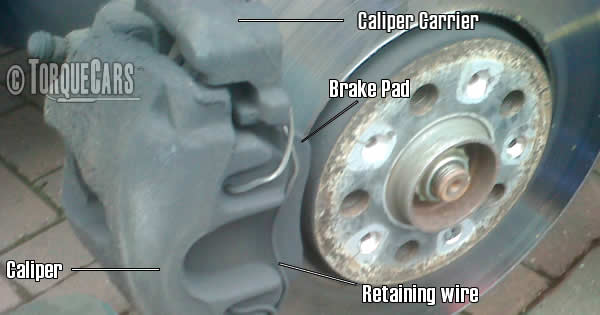
What you are looking at here is the brake disc itself, the caliper to the left, and the wire that helps keep the caliper tucked onto the outer brake pad, which you can see behind the wire. Most systems have some form of retaining wire. You can also see the top of the caliper carrier which holds the caliper in place. The caliper moves on sliding pins that are bolted to the carrier.
Here’s another picture from the top:
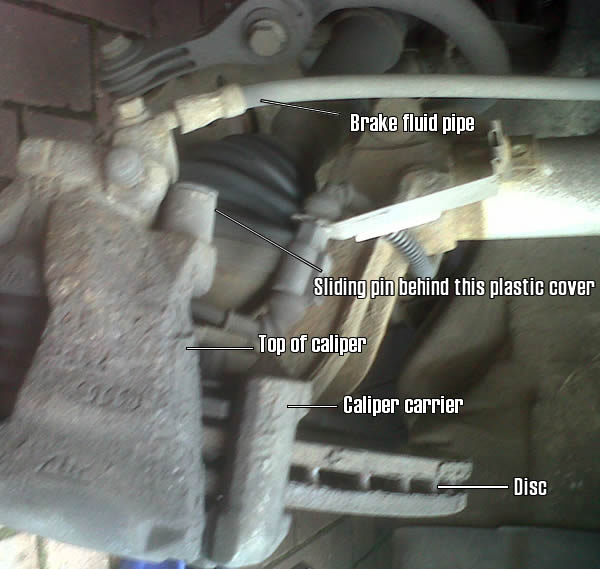
You can see the brake fluid pipe coming into the caliper, and the topmost sliding pin. There’ll be another underneath. These pins are usually removed with a T-socket or spline socket, so you will need the specific one. Google can usually tell you which one.
Taking off the caliper and pads:
So go ahead and disconnect the pad wear sensor cable if fitted.
Use a pair of pliers, or a screwdriver, and remove the retaining wire, again if you have one. This can be fiddly. Make sure you definitely know how it looks for when you are putting it back on.
Now remove the sliding pins. These are usually in a housing, covered with a plastic cap to stop gunge getting in. Here you can see me removing the top one:
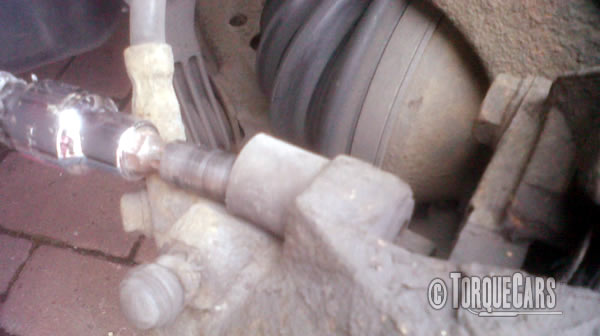
Some pins are screwed directly into the carrier and simply need one socket or T-bit to remove. Others, often on the rear brakes, screw into a bolt that itself screws into the carrier. In this case the bolt does not need to be removed, but you will need to use a spanner or wrench on the bolt to stop it rotating as you remove the pin. When the pins are removed they should be cleaned of any deposits, or replaced with new ones if there is any damage to them. This will make sure the caliper slides freely when you reassemble.
Now both pins are removed the caliper needs to be pulled away from the pads and disc. This can sometimes be difficult if the pads are seized onto it. You might find some gentle persuasion with a hammer is needed to break the seal. If you’re not changing the discs be careful not to damage them with the hammer while you do this. You may also find the inner pad that’s on the side that the piston is will have small metal arms that hold the pad to the inside of the piston. In this case as you slide the caliper away from the carrier the pad will come with it.
When the caliper comes away support it and don’t let it hang on the brake fluid pipe. Use a cable tie or piece of string and secure it out of the way up on the suspension spring.
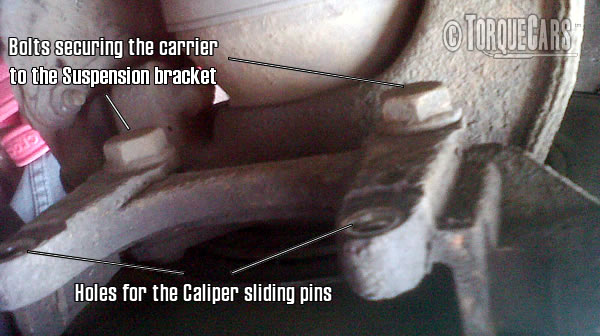
Take the other brake pad away and you’ll then see this, which is the empty caliper carrier:
If you’re only changing the pads you will not need to do anything else. Go straight to the reassembly section.
Removing the caliper carrier:
If you’re doing the pads and the discs then you will need to remove the carrier also. This is the two bolts you can see at the top of the picture. A little tip is to slacken the bottom bolt first but don’t fully remove it until you have removed the top one. This way you’ll stop the carrier swinging up as you turn the top bolt.
Removing the disc:
Once the carrier is removed you will be able to remove the disc. The disc is kept in place mainly by the wheel nuts themselves, plus a small screw. This screw is a complete pain. It will most likely be seized, and will either snap in half as you remove it, or you will have to use a hammer and screwdriver to knock it round, so ruining it anyway. Whatever happens I suggest you don’t need to worry about it. It’s pretty much superfluous, and often replacement discs come with neither a new screw nor a hole to stick it in. Remove it however you can and the old disc will come away. If it doesn’t it may have heat welded itself onto the hub. Get a hammer and give it a few smacks to break the seal.
Get a cloth and wipe the face of the hub that was behind the disc, get rid of any old gunge that’s there. Get some fresh copper grease and put some on the hub. This can help stop the new disc sticking to the hub again. Offer the disc up to the hub. If you do have a new screw use it. If not use a couple of the wheel nuts to hold the disc loosely in place, which you can see is what I have done in the last picture in this article.
Reassembly:
When you’re cleaning the caliper and carrier for reassembly pay special attention to the parts that touch the brake pads and where the brake pads sit in the carrier. If the slots are rough or dirty this can stop the pads moving freely and cause premature wear or brake seizure.
Now it’s time to put the caliper carrier back on. Before you do this, give it a clean with a stiff brush and cloth to get rid of bits and dust. Use a little bit of copper grease on the end of the bolt, again it helps to stop seizure and make it easier to take it off the next time. If you have a torque wrench use it, if not, don’t worry, get it as tight as you can, you’ll not strip these bolts.
Once that’s done you are at the point of putting the new pads on. Give the caliper a clean with a stiff brush but take care not to damage the rubber sleeve that surrounds the piston. If this is damaged it can let dirt in which can seize the piston.
Take the outer pad, the one that is not on the piston side. Use a little copper grease to coat the part of the caliper carrier that the ends of the pad touch, and on the back of the pad where the little arms of the caliper will touch the pad. Put the pad in place. Coat the parts on the inner side of the carrier where the inner pad will touch also.
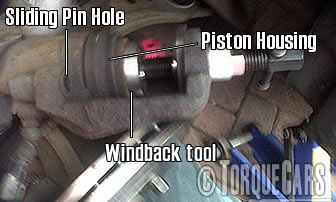
You now need to wind or push the piston back. Front pistons usually only require pushing. Rears, especially if they also are hooked up to the handbrake assembly, may need winding back. You can usually tell if a piston is a windback one if it has a slotted end. In either case the basic principle is the same. In the picture below you can see me using a tool in this case to push the piston back. The tool I have also has an adapter which will fit into the slots of a windback piston and turn the piston as it pushes it back.
The most important thing here is to check your brake fluid level as you wind the piston in, and remove brake fluid as necessary. You also need to take care again as you wind back not to damage the rubber sleeve.
If you find that the piston has seized then although you can often use a windback tool to force the piston back in I would recommend that you get the caliper changed as soon as you can as it may well seize again in the same place.
Once the piston is fully wound back remove the tool, get the remaining pad and if it is one of the pads which secure to the piston, put it there. Otherwise put the pad onto the caliper carrier as you did the other pad.
Offer the caliper up to the carrier. You need to reasonably quick here as the piston will slowly want to come forward. Stick a small amount of copper grease on the thread of your sliding pins and put them back. It’s best to have both in and screwed up a certain amount before you fully tighten either of them.
Don’t massively over-tighten these. Put any end caps there might have been back on. Pump the brake pedal a few times, then push down hard. As there’s no engine running it should feel solid and not sink down.
If it does sink down then you’ve got air in your system and need to get it checked. This is however a VERY rare occurrence and very unlikely to happen. If it all feels ok the last thing is to put the wire back on. Best bet is to secure one end first, then use a pair of pliers to get the other end in. Give it a gentle tap once it’s in to bed it against the caliper and carrier.
You should now see something like this:
New discs come with a thin protective film of oil and you will have likely got grubby fingermarks all over the disc so use a cloth and wipe it off as best you can.
If all is well, remove any wheel nuts you might have used to hold the disc in place. Put a little copper grease on the face of the disc that will be touching the inside of the wheel. Offer the wheel up, and try not to rotate the disc if it’s not secure by a screw. Tighten your wheel nuts to hand tight and then half a turn, then lower the car down and tighten fully.
Give yourself a pat on the back then crack on with the other side. Don’t forget to put the brake fluid reservoir cap back on and clean up any brake fluid spillages.
Once both sides are done go for a test drive. The brake pad may feel harder initially, plus your brakes won’t feel as good. Brakes need time to bed in before they perform at their best so try to avoid having to brake quickly from high speed.
Try not to brake harshly for a few hundred miles as repeated hard braking on new discs can sometimes warp them and they’ll need to be replaced again. You may also notice a slight hot oil smell as you leave the car, this will be any residue burning off the disc. You don’t need to worry unless it doesn’t go away after several drives.
That’s all there is to it. Best of luck. This article was written by Guy Heaton.
Please Check out my YouTube channel, we're regularly adding new content...
 Click to accept YouTube Cookies & Play.
Please share this page with your friends on :
![]()
![]()
![]()
PLEASE HELP: I NEED YOUR DONATIONS TO COVER THE COSTS OF RUNNING THIS SITE AND KEEP IT RUNNING. I do not charge you to access this website and it saves most TorqueCars readers $100's each year - but we are NON PROFIT and not even covering our costs. To keep us running PLEASE Donate here
If you liked this page please share it with your friends, drop a link to it in your favourite forum or use the bookmarking options to save it to your social media profile.
Feedback - What do You Think?
Please use our forums if you wish to ask a tuning question, and please note we do not sell parts or services, we are just an online magazine.
Help us improve, leave a suggestion or tip
Please watch this video and subscribe to my YouTube channel.
2 Responses to “Changing brake pads and discs a DIY guide”
New discs MUST be cleaned properlyas recomemded by DBA and NOT BURNED OFF.
Under no circumstances put cloth/rags on the resivor to lower the level.
Bed in the pads as per the makers instructions usually a number of medium pressure stops from say 60 kph to say 20 k app 1 klm apart .
I find that it is easier to crack open the bleed valve that has a length of clear tube on it leading to a container when winding or pushing the caliper piston back so the fluid is not pushed back to the resivor .this method also removes the fluid that has experienced the most severe temperature variations.